Motorized Pico Dolly
Motorized Pico Dolly
Update – New Pico Dolly Macro Test Video by request
This video demonstrates the use of an iPhone with a macro lens attached, requested by one of my commenter. Depending on the servo you use. You can get a very slow and smooth motion.
Updated – with wiring diagram
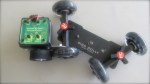
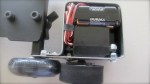
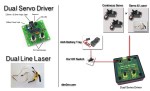
Here is a simplified version of my motorized pico dolly.
Parts used:
HS-1425CR Continuous Rotation Servo
12″ Aluminum Ruler – Target
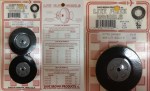
1pc Foam Wheel – Local Hobby store
Double sided Tape and electrical tape.
Additional Hardware – Screws, small bolts and rivets.
I’ll post more pictures soon on how it looks from the inside.
Thanks
More details

What is the part number for the double laser that was used? Thanks.
Hi Gary,
i purchased the lase on amazon…name “Instapark® 9x22mm Laser Module (Line)650nm 5mW” I just checked it right now and there isn’t any in stock.
I looked in ebay and they have some there. Just search for Line laser. Here is one that is similar to what i used.
http://www.ebay.com/itm/New-12mm-x-35mm-Red-Laser-Line-Generator-Diode-Module-650nm-5mW-/320876720830?pt=LH_DefaultDomain_0&hash=item4ab5be32be
It’s Line laser 650mn 5mW, the only different is, its dimensions are bigger. 12x35mm vs 9x12mm. But it would still work as them same.
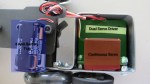
I hope that helps. If you gotten the Dual servo driver, thats where i powered the laser.
Thanks
dim3m
I ordered most of the parts except for the foam wheel. Would you know where I could order it as well as a part number? It would make it much easier than trying to track it down myself. Thanks.
Hey Gary,
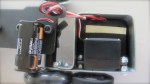
I posted additional images to see how it all comes together. Also included the last picture of the wheel used. Hope this helps.
Thanks
dim3m
I’m rellay into it, thanks for this great stuff!
what about wiring?
What about wiring? do you have any links to what you used?
Wiring is pretty basic. I used what the servo, on/ off switch, and battery compartment already had.
If I were a Teenage Mutant Ninja Turtle, now I’d say “Knwobuaga, dude!”
The accident of finding this post has brnhiteged my day
Glad to hear that 🙂
Looking forward to taking mine for a test drive. Thanks for sharing the project with us.
I hope to see it. let me know when its done and I can post it here and share with other if you want.
Thanks again.
Great inhitsg. Relieved I’m on the same side as you.
Cool design! It looks like the foam wheels come in two sizes, 1 1/2 inch and 3 1/2 inch. I’m assuming you are using the 1 1/2 inch wheels to drive your dolly, is that correct? Thanks.
I used 2 inch wheels
Hi dim3m,
Could I pay you to build a motor and laser system for my pico dolly? i am very impressed with your design, your motor system seems to capture the best quality footage I’ve seen. I’m also looking for this to have a wired controller to control speed/power, and to make the motor start and stop smoothly, move at variable speeds, and also maintain a smooth very low speed. Is this possible?
Thanks,
Kevin
Hi Kevin,
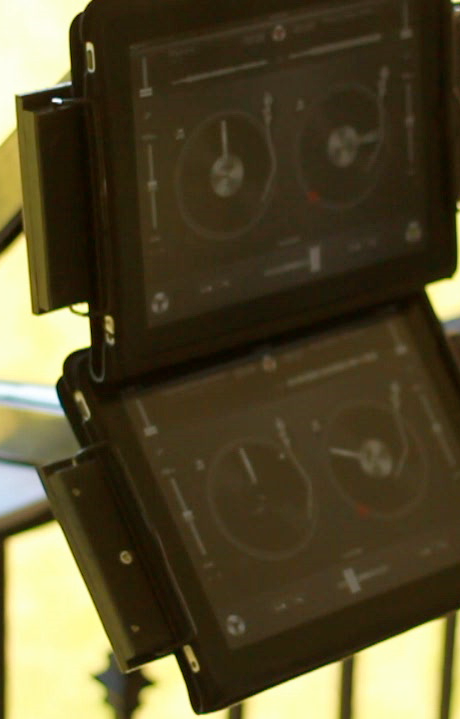
Thanks for taking interest on my Motorized Pico dolly project. Unfortunately, I can not build you one. Not that I do not want to. But due to my busy work. I did post on my blog all the parts that you would need to build one. Your idea of having a wired controller is doable. The dual servo driver on mine have control knobs that adjust the speed of the servo. If by chance maybe in 2 or 3 months. I might start building again. I could build you one, but then I know this is some thing you would want right away. Anyways, i hope i can assist you in any other way.
Thanks
Please keep in touch, I am interested, even if it takes months.
When you have time, email me (does this site give you my email address?) and I can give you more detail about what I would like to use it for, and what you would charge to build it.
Thanks!
hi dim3m,
would this servo be strong enough to pull the dolly if i have my DSLR mounted. thanks.
Yes, I have a Canon T4i and it work fine.
No quisteon this is the place to get this info, thanks y’all.
i would also like to know why you use a dual servo. driver. would a single driver not be sufficient. thanks.
I think a single driver would work. I used a dual for 2 reasons. 1. it powers the line lasers. And 2 its big shape provided a base to put all the components together.
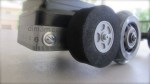
excuse all the questions please. how did you mount the foam rubber wheel to the servo. thanks.
You can ask me as much questions you like regarding my projects. I’m glad your interested. I screwed the Rubber wheel to the servo. It wasn’t easy, You have to find one narrow enough and just long enough to screw into the servo without damaging it. Anyways, hope that help. Just ask away if you need help.
thanks
dim3m
It’s much easier to unaerstdnd when you put it that way!
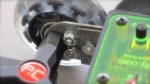
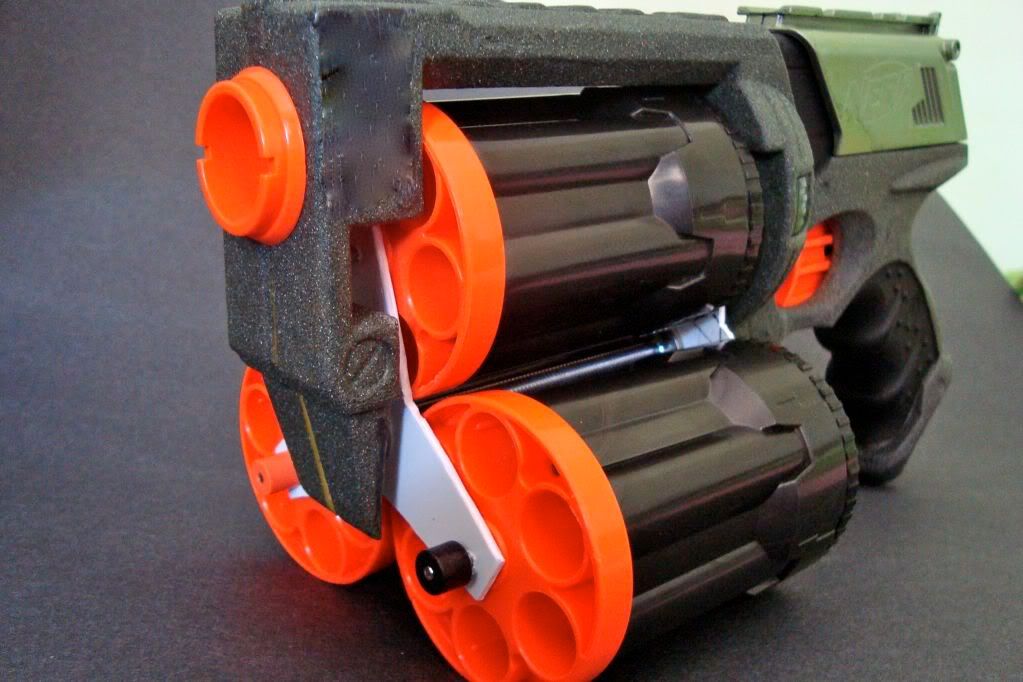
thanks for the info. will be building mine soon. there are 2 small bolts and nuts above and below the front axle.on the ruler. see image third from left. what is their purpose.
Great question. The ruler i used had already a hole in it which i had to drill slightly bigger to make it fit the dolly’s axle. Now when it is put together, the weight of the battery, servo driver and servo will lean down. If you tighten the screws on the dolly’s wheel. Then it won’t lean down but the pico’s wheel will be to tight to turn. So what i did is put a 2 nuts and bolt against the hex shape axle as a stopper from preventing it to lean down.
Thanks
cool. thanks. i suspected that, but wanted confirmation.
Thank you for showing us. I would like to know if we can change the speed to a low number of rpm such as 1~5?
Yes, the motor has speed control
Wow, that’s a really clever way of thikning about it!
Great build! Thank you for posting it!
Do you think this motorized setup would be suitable for macro shots, using an iPhone (or similar smartphone)?
Of course I’d rather use a DSLR, but I’m teaching a class to some grad students about how to make video essays, and the school wants them to use their iPhones (don’t ask me why).
I’ve been asked to find a way for them to make macro shots that have dolly moves in them, and we have less than $100 to do it. Since the department has a few of these P&C Pico Dollies, I’ve been looking for a solution that involves it.
Do you think yours would work? How smoothly does the motor turn? Tiny wobbles or jerks are super visible in macro. Any thoughts would be really great!
Thanks
Hi Joshua,
Sorry for the late response. Thanks for taking interest in my work/ builds. I believe my motorized setup would work with macro video shots. I will try to make a short video and post it on youtube for you. I only thing that you would have to keep in mind are:
1. Surface of where you place your pico dolly has to be completely flat and have good traction to the wheels. Because the dolly has 4 wheels, there is a chance that 3 of the wheels can balance off one wheel.
2. The motor i used is pretty smooth enough but does make a sound.
I think using an iPhone or similar device would be better since the weight does mater a lot when you apply it to a small dolly. If you have the dolly that has 3 wheels, I believe that one would be good.
Anyways, I’ll try to do the video for you.
Thanks
dim3m
Thanks so much for responding! I only have access to the pico dolly, exactly as you have in the video. I ordered the same motor as the one you used, the same foam wheel, etc. The only difference is I got a servo-tester http://amzn.com/B008MVCPQ6 instead of the dual servo driver, because it was MUCH cheaper, and I also wanted to have the controls off the dolly. As for the noise, well, if they want a perfectly silent motorized dolly, they need to spend more money.
I plan to use some sort of plastic or metal project enclosure to hold all the parts. Any thoughts on that would be very welcome.
Regarding the surface it runs on, I was thinking of getting some metal shelf brackets or something to give it a perfectly smooth track. For curved shots we’ll have to find a nice smooth table.
Thanks also for offering to make a video! I would love to see it, but I totally understand if you haven’t got time.
I’ll post once I manage to get the whole thing together.
Josh
Hey Josh,
Here is a simple demo video:
I kinda did it in a rush but i hope it answers your question.
As for the the enclosure. Since you will be putting it off the Dolly, it won’t matter what kind of enclosure you use as long as it meets your needs. My enclosure for my dolly was made from a ruler I got from target and just bent it around the controller. My enclosure had 2 purpose; A mount from the servo to the dolly, and an enclosure for all the components.
As far as the smooth surface. Balance is also important. When I did the demo video of mine. Due to the camera/ iphone and mini LED light was further away, the center weight was off and caused one of the wheel to be lifted. But counter balance weight will easily resolve the issue.
Anyways, Thanks for taking interest in my work/ builds. Feel free to ask any questions or support and I’ll will try respond as soon as I can.
May I also ask where you are at? Just wondering.
Thanks
dim3m
Wow, thanks SO MUCH for making a test video for me! I think it looks really fantastic, so I’m working on it now.
I’m in Brooklyn, NY.
Thanks again!
Josh
by the way, are you using the Kick to light those shots? They look great!
Hey Josh,
Sorry for the very late response. I hope you are doing great with your build. Anyways the light I used is:
http://photojojo.com/store/awesomeness/pocket-spotlight/
I find this light very light weight, portable and easy to use.
Thanks again for taking interest in my builds. Feel free to ask any questions.
dim3m
Hey Dim3M,
Genius build. This was the sole motorized DIY I found with little to no shake.
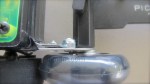
Had a question on the laser mounts. What type of bracket did you use and where did you get the dual laser wire from? I’ve found the remaining (major) components on your list. Thanks for that by the way.
Lastly, would you be able to tell me what size, number, and types of nuts, screws, and washers we need?
Thanks again!
Jay
Hi Jay,
Thanks a lot of taking interests in my builds. The mounts I used for the laser are just basically a piece of flat metal bar, driller a hole and added heat shrink tube. The heat shrink provides protection from the sharp edges of the metal bar and adds slight stability to the metal bar depending on the thickness of the metal. And then tape or heat shrink the laser on to the metal bar. With the 2 lasers, I just put the wires together positive and positive, negative and negative.
Please use caution when using the laser during the setup. Avoid laser being pointed to your camera. Some camera sensors are sensitive. I haven’t had any problems when I built mine but something to be caution about.
And last the screws, nuts and washers. I can’t really say the size I used. I have a container of mix and match of these screws, nuts and washers. From old stuff I’ve taken apart. But Im sure you can find these at a local hobby store. I used a mix of wood screws and machine screws. I hope that helps.
Thanks
dim3m
I read your post and wished I’d writetn it
Dim3m,
I apologize for all the questions. Are you using the HS or Parralax servo? I ordered the HS, but noticed the dimensions are different. Should I order the Parralax and return the HS? I see the Parralax also has an easy ramping feature I’m not sure HS does. Trying to avoid any jerk in the video capture.
Thanks again,
Jay
Hi Jay,
You know what. I’m not familiar with HS or Parralx servo. I noticed the link I provided was for a HS servo. Anyways, the reason I am not familiar is that when I get an Idea, may it be from electronics or plumbing or installing roof shingles. I do my research and learn along the way, what I only need to know. And I share what I learn here. So with that in mind. You can use the HS or Parralax. And I would appreciate if you let me know how it works out for you.
No need to apologize for the questions. I enjoy entertaining to those who wants to learn and share ideas with.
Thanks again.
dim3m
Thanks Dim3m! I’m hoping to have all the components shipped by Tuesday. I’ll definetly reach out to you once complete.
Jay
Thank you! I went ahead and purchased your recommended items. Materials should arrive by the end of the week. My only concern is the how to make the compartment. I read your previous comments and watched your video – there isn’t enough of a description of how the ruler, double sided tape is used. Additionally, I haven’t been able to find the lasers you suggested. Any additional comments would be greatly appreciated!
Thank you so much already. I’m excited to build this.
Hey,
Sorry for the late response. I bent the ruler to the exact shape around the servo controller. I used double sided tape to stick the battery compartment under the servo controller. Feel free to keep asking me. I might respond late but I don’t mind helping you out.
Thanks for taking interest.
Hi – any more insight you can provide? I’ve received all my items.
As for the lasers, its not really as accurate. Maybe add that later on. I’ll see if I can find the same one i used.